The humvee is a stalwart of the US military’s wheeled fleet. It has towed troops across foreign battlefields and suburban soccer fields alike.
Although the army is switching over to better-protected JLTVs, HMMWVs will continue to roam the world. But what’s a humvee and how does it work? The answers are more surprising than you might think. Click Street Legal Exports to learn more.
Aside from being able to traverse a variety of terrains, the humvee is capable of carrying heavy loads and serving as a mobile command post. The vehicle has a high ground clearance, full-time four-wheel drive and independent suspension. It can also climb a 60% slope and ford rivers. The humvee can be modified in many different ways, including adding a turret, weapons mounts and wire-guided anti-tank missile launchers. Its ability to withstand multiple rounds of fire and other assaults makes it an invaluable tool in military operations.
In the past, the humvee was used to transport troops and supplies, carry out front-line reconnaissance patrols and function as a mobile command post. However, since the introduction of improvised explosive devices, the Corps has begun to rely on other types of vehicles for these missions. The Corps is hoping to replace the humvee with the Joint Light Tactical Vehicle, which will be faster and better armored. But the first JLTVs won’t arrive until 2019, and even then, the Corps will only receive 69 of them.
Although the HMMWV has a boxy, ungainly appearance, it is an extremely versatile and effective piece of equipment for the military. It can be configured into 15 different variations, ranging from cargo and troop carriers to field ambulances. And even though each one has its own unique body style, the chassis and engine are similar for all 15. The humvee has 44 interchangeable parts that can be used in more than one configuration, which reduces maintenance costs and saves taxpayer money.
Another great feature of the humvee is its ability to travel long distances without the need for fuel or other resources. It can be driven for up to 700 miles on a single tank of gas, which is more than double the range of other military vehicles. It can also travel at speeds up to 70mph on a highway.
The humvee has several advantages over other vehicles, including its ability to withstand heavy-duty operations in hostile environments. In addition, it is easy to modify for specific tasks, such as adding a turret or armored doors. The humvee is also very durable and has a high Reliability, Availability and Maintainability rating. This means it is highly reliable and can be maintained at a reasonable cost.
Civilian
The military Humvee is a symbol of ruggedness and military might, but it’s also a popular civilian vehicle. These vehicles are perfect for off-road enthusiasts and anyone who wants to be seen in a unique vehicle. But before you go out and buy one of these bad boys, there are some things you should know. This blog post will explore the ins and outs of owning a civilian Humvee from Street Legal Exports.
What’s a Humvee?
The Humvee is a nickname for the High Mobility Multipurpose Wheeled Vehicle, or HMMWV. It was first used by the military in the 1980s and became a favorite of soldiers because it could navigate difficult terrain. It is now a common sight on the roads across America.
In 2014, the Defense Logistics Agency, which manages the military’s surplus equipment, sought and received an official determination from the Departments of State and Commerce that two most basic Humvee models that don’t have armor can be sold without restriction. But since then, DLA hasn’t sought interagency confirmation on whether any other models can be sold. And some parts of the military, including the Marine Corps and Special Operations Command, have been demilitarizing and selling Humvees that DLA won’t (including those with add-on armor), even though doing so isn’t required under the law.
DLA’s reason for not seeking a formal determination that other unarmored Humvees can be sold is that it would be too burdensome to go through the process of obtaining an interagency confirmation for every model of vehicle it has in stock. But that’s a dubious excuse. The 2014 reform explicitly allows other departments to self-determine which list a particular item should be governed by, and State and Commerce haven’t objected to the Marine Corps and SOCOM’s practice of going beyond the rules.
Although a Humvee is great for off-road adventures, it’s not suited to everyday driving. It’s not as fuel-efficient as a typical car, and it can be tough to maneuver on narrow city streets and parking garages. Also, you’ll have to take into account the cost of maintenance and repairs.
Off-Road
Whether you’re looking to conquer muddy trails or tackle snowy roads, a military Humvee for sale is an ideal off-road vehicle. These machines were designed with military standards in mind, meaning they’re incredibly durable and can withstand punishment that would destroy other vehicles. They also have an iconic look that’s instantly recognizable and will turn heads wherever you go.
Since its introduction in the 1970s, the Humvee has dominated off-road competition. Its bonded aluminum panels allow the vehicle to flex in rough terrain, and independent front and rear suspensions provide superior handling. In addition to this, the engine is waterproof and can drive underwater, allowing the vehicle to navigate difficult terrain like swamps and deserts. This makes the HMMWV the ultimate off-road warrior.
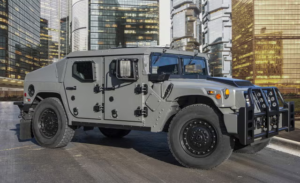
The HMMWV is the main light tactical vehicle of the US Army. Manufactured by AM General, the Humvee (pronounced hmv) is a four-wheel drive military truck that serves in the core of the Army’s wheeled fleet. It has been an icon of war for nearly four decades and is the most versatile light military vehicle on the planet.
With a maximum payload of 2,500 pounds, the HMMWV can carry heavy equipment like machine gun turrets and ambulance cabs. In some cases, it can even be sling-loaded from helicopters and dropped in combat without an aircraft needing to land. The HMMWV’s rugged construction and versatile capability have made it an essential component of military operations around the world.
In 2021, the HMMWV began to be replaced by a new model called the Joint Light Tactical Vehicle, or JLTV. The JLTV has a better armored hull, a more powerful diesel engine, and increased ground clearance. It can also accommodate more passengers and cargo. The Army plans to replace 10,000 of its aging humvees with the new vehicles by 2023.
If you’re looking to buy a military Humvee for civilian use, contact Street Legal Exports. They specialize in converting military vehicles into street-legal machines, allowing you to enjoy the full capabilities of this unique vehicle. They will help you find the perfect Humvee for your needs and assist you with the EUC process.
Utility
The HMMWV, or Humvee, is one of the most versatile vehicles in the military’s arsenal. It can be configured as a troop carrier, command vehicle, ambulance, or utility vehicle to suit any mission. This flexibility has helped the Humvee become a staple of military operations both in America and abroad.
The Humvee is also known for its ability to navigate difficult terrain. The four-wheel drive system and high ground clearance allow the Humvee to go over obstacles with ease. In addition, the Humvee’s body and chassis are made of steel, giving it the strength to withstand rough conditions.
Because of its unique design, the Humvee is not as fuel efficient as other vehicles. However, with proper maintenance and fuel economy improvements, it is possible to get better mileage out of a Humvee. The vehicle’s large cargo space and towing capability make it ideal for carrying cargo and equipment.
Compared to other light vehicles, the Humvee is much larger. This can be attributed to its unique design, which includes a wider track and lower profile. In addition, the Humvee is equipped with loops around its frame that can hold the entire weight of the vehicle. This allows the vehicle to be loaded onto a plane and dropped via parachute.
The Humvee has been used by the military in a variety of missions, including the Gulf War and Operation Just Cause in Panama. However, it has never gained the same level of popularity and recognition as other military vehicles such as the M1 Abrams tank. While the JLTV may replace some of the Humvees in the future, the vehicle will remain a fixture in the military’s arsenal for years to come.
The HMMWV, or Humvee, was first introduced in 1984 and has since become a staple of the military worldwide. It has been used in many different missions, from disaster response to combating insurgency. The vehicle is a popular choice for military personnel because of its durability, versatility, and affordability. The HMMWV has also been used by civilians for personal and business purposes. In fact, the Hummer, a civilian version of the HMMWV, has been sold to over 30 countries.